Configuring Apple Pay
EzyStream is proud to be one of the software companies offering this market leading option for Giving to your organisation. Apple has strict rules regarding how Apple Pay is allowed to be used within iOS apps, and approval may need to be granted to your organisation to use this option. If you use EzyChurch, this option will already be active. If you have a custom app, your app will need to be updated. To get started, please follow the instructions below and send an email to help@ezystream.com to let us know your intentions, or if you need help with this.
Please note that your EzyStream Giving solution will work 100% without Apple Pay, by asking your user to load their Debit/Card directly.
Registering your App for Apple Pay
Apple require that every organisation receiving donations from within an app using Apple Pay be approved as a registered charity in their home territory. They have contracted this service out to an organisation called Benevity – who are integrated with the local agent Tech Soup in NZ and ? in Australia.
You may have already registered your organisation with the local agent and this means you will already be in the Benevity database.
Registration is simple:
- Visit https://causes.benevity.org/causes/claim-cause-search.
- If you can't find your organisation in the search, you'll need to create a request with Benevity to add you. This can be done here: https://causeshelp.benevity.org/hc/en-us/requests/new
- Chose your country, and enter your registered charity name.
- Click view details when your charity appears.
- Click Register Your Charity and fill out the contact details page.
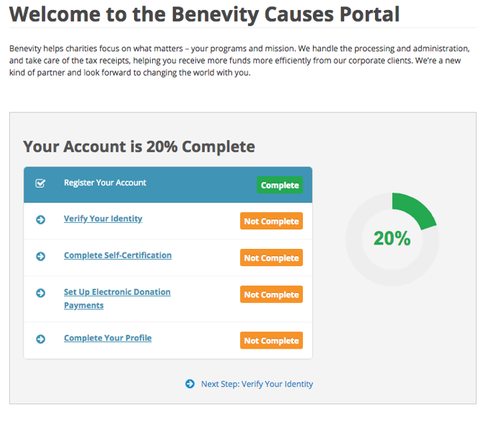
- Once your basic details are entered, you will be presented with this screen:
- Please fill in each section in turn. You can return to the dashboard (as shown above) by clicking ‘Dashbaord’ on the side menu bar.
- You may need to send identity document copies to Benevity. If so, please email the documents they request to verification@benevity.org
- Complete the self-certification declaration. Note: you can continue with all remaining steps, even if you have been required to send Benevity ID documents. Completing everything now, will save a lot of time.
- Setup Electronic Donation Payments. Although you will not receive money from Benevity, they will require you to fill in this section and provide proof of a bank account – this can be a bank statement with your charity’s name on it, showing an account number and the name and address of your bank. You can upload this form directly.
- Finally click, complete your profile. You will need to enter a brief mission statement and description of your charitable activities. You’ll also need a valid website – note the facebook and twitter information is NOT compulsory. Make sure you click save.
Once verified – you will receive a verification message. MAKE SURE YOU LET US KNOW! We can then apply for the Apple stamp of approval and have seamless giving up and running in no time at all.
If you have ANY questions at all – please contact your Account Manager.
Although this process may seem a little annoying – it is a one-time requirement, and also sets you up for charitable discounts for Google services including GSuite etc – so it is well worth doing.
Related articles
Related content
Struggling to find an answer to your question? Send us an email: help@ezystream.com
